In the last section, you added a form to the Bakery site to collect information from the customer. Now you are going to process the content of that form to generate an email.
Prior to adding code for email, finish the OrderSuccess.cshtml page off by adding the following:
<div class="message order-success">
    <h2>Thank you for your order!</h2>
    <p>We are processing your order and have sent a confirmation email. Thank you for your business and enjoy!</p>
</div>
Email in .NET
Sending email in .NET is quite easy. There isn't much code required for a basic email. All you need to do is to add a usingdirective to the top of Order.cshtml.cs:
using System.Net.Mail;
and then add the following highlighted code to the OnPostAsync method in the same file:
public async Task<IActionResult> OnPostAsync()
{
    Product = await db.Products.FindAsync(Id);
    if(ModelState.IsValid){

        var body = $@"<p>Thank you, we have received your order for {OrderQuantity} unit(s) of {Product.Name}!</p>
        <p>Your address is: <br/>{OrderShipping.Replace("\n", "<br/>")}</p>
        Your total is ${Product.Price * OrderQuantity}.<br/>
        We will contact you if we have questions about your order.  Thanks!<br/>";

        using(var smtp = new SmtpClient())
        {
            smtp.DeliveryMethod = SmtpDeliveryMethod.SpecifiedPickupDirectory;
            smtp.PickupDirectoryLocation = @"c:\mailpickup";
            var message = new MailMessage();
            message.To.Add(OrderEmail);
            message.Subject = "Fourth Coffee - New Order";
            message.Body = body;
            message.IsBodyHtml = true;
            message.From = new MailAddress("[email protected]");
            await smtp.SendMailAsync(message);
        }

        return RedirectToPage("OrderSuccess");
    }
    return Page();
}
This code uses the SpecifiedPickupDirectory option for the delivery method, ensuring that the resulting email is created in a local folder. That way, it's easy to test that everything worked by simply looking in the specified folder. Feel free to alter the location to somewhere that suits your environment.
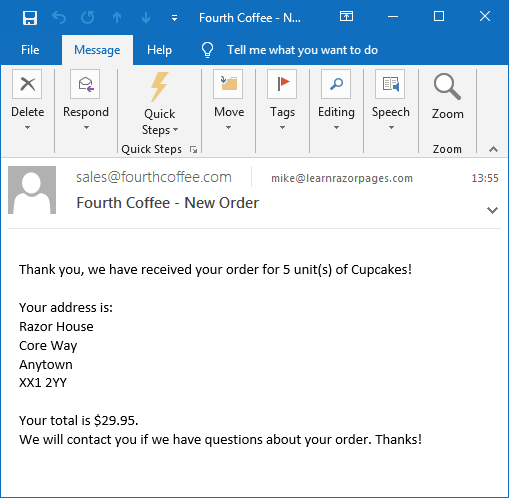
Now run the application and select a product. Then enter valid values into the form and process the order. You should find an eml file in the specified folder, containing the generated message:
Emailing Options
This version doesn't actually send an email anywhere. You can however test sending email via Gmail or Outlook/Hotmail/Live or indeed any other service provider that allows you to connect to their mail servers. Here are the standard configuration settings for Gmail and Microsoft's email services, which are virtually the same as eachother:
| Gmail | Outlook/Live | |
|---|---|---|
| Host | smtp.gmail.com | smtp-mail.outlook.com |
| Port | 587 | 587 |
| EnableSsl | true | true |
| User Name | Your email address | Your email address |
| Password | Your account password | Your account password |
You should check your provider's documentation for the correct values if you aren't using either of the services featured here. You can also send email to Port 465, but your site must be running under HTTPS for this to work, and you should not set EnableSsl to true when doing so.
The next code block shows how to alter the example above to make use of Gmail:
using(var smtp = new SmtpClient())
{
    var credential = new NetworkCredential
    {
        UserName = "[email protected]",  // replace with valid value
        Password = "password"  // replace with valid value
    };
    smtp.Credentials = credential;
    smtp.Host = "smtp.gmail.com";
    smtp.Port = 587;
    smtp.EnableSsl = true;
    message.To.Add(OrderEmail);
    message.Subject = "Fourth Coffee - New Order";
    message.Body = body;
    message.IsBodyHtml = true;
    message.From = new MailAddress("[email protected]");
    await smtp.SendMailAsync(message);
}
Note that email service providers like Gmail typically do not allow you to send email from an address other than those associated with the account that you are using.
Summary
Now that you have reached this point, the port from the ASP.NET Web Pages Bakery template is complete. The Razor Pages version is available on Github, but things do not stop there. Further sections are planned which will cover more Razor Pages functionality. Once completed, the next section will look at scaffolding CRUD pages so that you can add more products to the database, and modify the existing ones.
Previous: Working With Forms
