So far, you have obtained the .NET SDK and chosen a code editor for building a Razor Pages application. You have created a web application from a starter template using the .NET CLI. The web application currently has three pages. It's going to need some more. You will use the templating system to generate an About page, this time with the command dotnet new page.
Once you have created the page, you will modify the site's layout file which controls the look and feel of all of the site's content.
If the application is still running from the previous section, you can either open another terminal (Ctrl+Shift+') or you can press Ctrl+C to shut the web server down. Once you have done that, execute the following command:
dotnet new page --name About --namespace Bakery.Pages --output PagesThe command generates two new files, one with a .cshtml extension and another with a .csthml.cs extension. The first is a Razor file which will contain Razor syntax - a mixture of HTML markup and C# code representing the content of the page. The second is a C# code file containing a class named
AboutModelthat derives fromPageModel. This file acts as a combined controller and view model.The name of the page itself is ppassed to the
--name(-n) option. The namespace for the PageModel class is specified via the--namespace( or-p:n) option. If you don't provide one, the default value ofMyApp.Namespaceis used. Likewise, if you don't specify a location for the generated output (using the--outputor-ooption), the files will be generated in the folder where the command is executed. Razor pages need to be located in the Pages folder or its sub-folders, otherwise the routing system will not locate them.When you get confirmation that the page was created successfully, open the newly create About.cshtml.cs file (the PageModel file), and amend its content to include a public property - a string named
TimeOfDay- together with some code in theOnGetmethod that sets its value to morning, afternoon or evening depending on the current time of the day:public class AboutModel : PageModel { public string TimeOfDay { get; set; } public void OnGet() { TimeOfDay = "evening"; if(DateTime.Now.Hour < 18){ TimeOfDay = "afternoon"; } if(DateTime.Now.Hour < 12){ TimeOfDay = "morning"; } } }The
OnGetmethod is a handler method that is executed by the framework whenever the page is requested using the HTTPGETmethod.Once you have made those changes, alter the About.cshtml file so that it's content is as follows:
@page
@model Bakery.Pages.AboutModel
@{
    ViewData["Title"] = "About Us";
}
<section id="main">
    <h1>Good @Model.TimeOfDay, and welcome to The Bakery Shop!</h1>
    <p>The Bakery Shop was established in 2020, offering a wide selection of freshly baked goods and coffee that can be conveniently ordered online and delivered straight to your doorstep. The business was founded by Mike, a former farmer who discovered his talent for baking during his spare time.
</p>
<p>Despite his success in the agriculture industry, Mike had always enjoyed experimenting in the kitchen and had a particular passion for baking. He spent countless hours perfecting his recipes, and soon found that his baked goods were in high demand amongst his friends and family.
</p>
<p>Encouraged by their feedback, Mike decided to take a leap of faith and pursue his passion for baking full-time. He started The Bakery Shop, combining his expertise in growing top quality food with his culinary skills to create a business that offers top-quality baked goods, made with all-natural ingredients and sourced locally.
</p>
<p>Today, The Bakery Shop is known for its mouth-watering pastries, cookies, cakes, and coffee, as well as its state-of-the-art online ordering system that makes it easy for customers to place their orders and receive them within 24 hours. Despite his success, Mike remains humble and dedicated to producing the best possible products for his customers.
</p>
</section>
The
@pagedirective at the top of the file indicates that this is a navigable page. We will explore some aspects of navigation in the next section.The
@modeldeclaration defines the model for the page and is set to the name of the PageModel class declared in the accompanying code-behind or PageModel file which was generated - About.cshtml.cs. Public properties on the PageModel class are exposed to the content page via itsModelproperty.Note the
ViewDataproperty, which is a dictionary that holds other data for the view or page. At the top of the page, an entry with the key "Title" is set to "About Us".The
h1content begins with the literal textGoodfollowed by the expression@Model.TimeOfDay. The@symbol is Razor syntax that denotes where we transition from literal HTML markup to C# code. In this case, the C# code is theTimeOfDayproperty of theAboutModelclass, which is exposed to the Razor page via itsModelproperty. The result of the expression will be rendered inline at this point at runtime.Launch the application again, this time using
dotnet watchand navigate to/about. You should see the page you just created: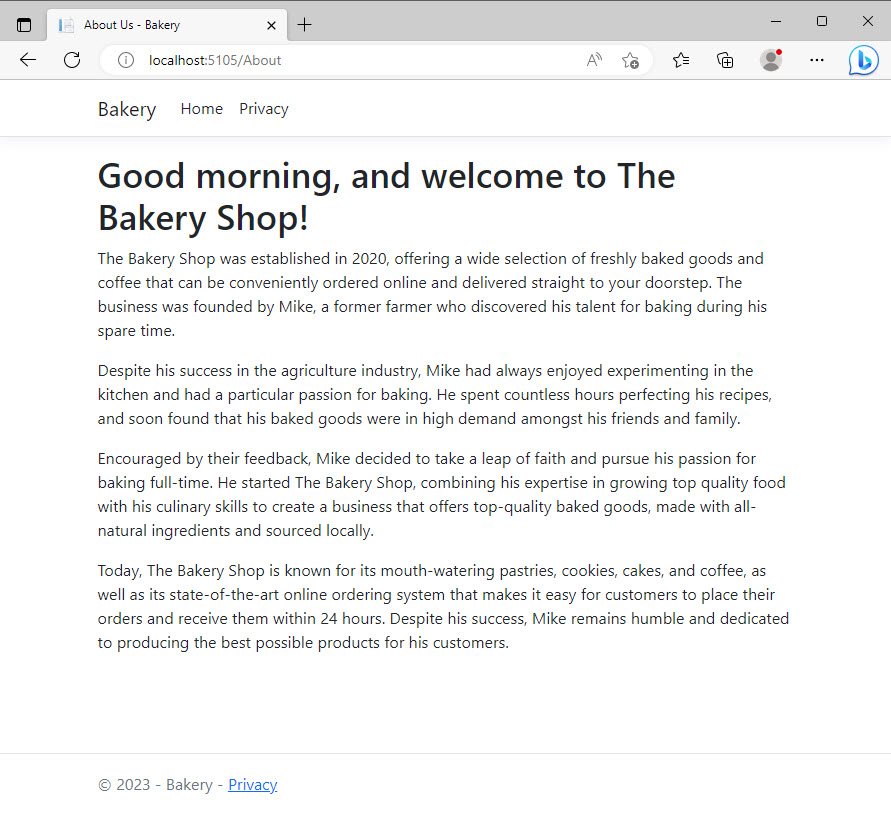
Hot Reload
The dotnet watch command launches the application in a browser and initialises the Hot Reload feature which is available from .NET 6 onwards. It applies code changes, including changes made to styleheets and script files to the application without requiring you to continually stop and rebuild your application or refresh your browser. In a Razor Pages app, Hot Reload triggers a browser refresh automatically for supported code changes.
Notice that the navigation menu appears at the top of the page along with the footer at the bottom, just like on the home page. Neither form part of the page you just created, so where did they come from?
Layout pages
The header, footer and other common site content that applies to all pages such as CSS and scripts is defined in the _Pages/Shared/_Layout.cshtml file. This is known as a Layout page and acts as a wrapper around the content of any page that references it. The layout is assigned to all pages in the Pages folder and its sub-folders via the _ViewStart.cshtml file in the Pages folder.
The content of the About page is rendered at the point in the layout page where you see the call to the RenderBody method:
@RenderBody()
This method call is what defines a layout page.
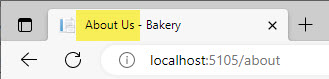
Check the title element at the top of the layout page and you can see where the ViewData["Title"] value is rendered. It is concatenated with the name of the site and is visible in your browser tab (if your browser has one):
Finishing Off
Finally in this section, you will tweak the layout page to change the branding, include a web font which will be used for the brand and you will add some CSS styles. You will also add some Bootstrap CSS classes so that the footer will naturally appear at the bottom of the viewport when there's not enough content, and it will be pushed down to the end of the content if it overflows the viewport. You will do this while the application is running under the dotnet watch command so that you can see the Hot Reload feature in action.
Add a Bootstrap CSS class to the <head> element itself to set its height to 100%:
<head class="h-100">
Now alter the <body> element to include the following CSS classes which uses flexbox to stack child elements vertically and to set its height to 100% and its margins to zero:
<body class="h-100 d-flex flex-column m-0">
The final part of positioning the footer is to tell the main container to grow and occupy any available space, pushing the footer to the bottom of the viewport when there isn't enough content, using the flex-grow-1 class:
<div class="container flex-grow-1">
    <main role="main" class="pb-3">
        @RenderBody()
    </main>
</div>
Then delete the .footer styles from the _Layout.cshtml.css file in the /Pages/Shared folder.
Note
The _Layout.cshtml.css file belongs to a feature known as CSS isolation. Common in component-based web development frameworks such as React or Blazor, this feature ennables you to isolate style declarations to a specific page or file. You can read more about CSS Isolation In Razor Pages here.
On to the branding.
Add the following code to the end of the <head> element, which references a Google web font and makes it available to all pages that reference the layout page:
    <link rel="preconnect" href="https://fonts.gstatic.com" crossorigin>
    <link href="https://fonts.googleapis.com/css2?family=Limelight&display=swap" rel="stylesheet">
</head>
Alter the places where the "Bakery" branding currently exists:
- the
titleelement in the head of the layout - the anchor tag with the
navbar-brandCSS class in thenav - the footer, just after the copyright year
so that the text says "The Bakery Shop" instead of "Bakery":
<body class="h-100 d-flex flex-column m-0">
    <header>
        <nav class="navbar navbar-expand-sm navbar-toggleable-sm navbar-light bg-white border-bottom box-shadow mb-3">
            <div class="container">
                <a class="navbar-brand" asp-page="/Index">
                    The Bakery Shop
                </a>
                <button class="navbar-toggler" type="button" data-toggle="collapse" data-target=".navbar-collapse" aria-controls="navbarSupportedContent"
                        aria-expanded="false" aria-label="Toggle navigation">
                    <span class="navbar-toggler-icon"></span>
                </button>
Save the changes and keep an eye on the browser. The page should reload and the text changes should be applied. Finally, add the following style declarations to the site.css file, found in wwwroot/css:
.navbar-nav {
  justify-content: flex-end;
}
.navbar-brand{
  font-family: Limelight, sans-serif;
  font-size: 2.5rem;
}
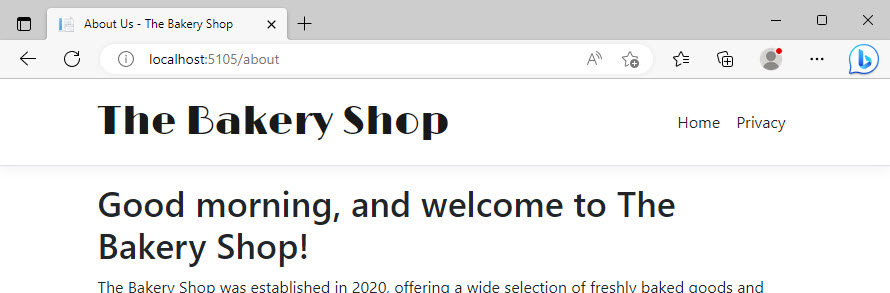
The browser should reload again to show the Limelight font being applied to the branding:
Summary
In this section, you have seen how to use the template instantiation commands to add a new Razor page to a web application. You saw that the Razor page comprises of two filess - a content page and a code-behind file containing a class that derives from PageModel. You added some markup to the content page. Then you modified the layout page content that controls the look and feel of the site content and you used dotnet watch to see those changes being applied to the running application automatically.
In the next section, you modify the navigation menu to include a link to the new page, and learn a bit about tag helpers and routing in Razor pages.
Next: Navigation and URLs
Previous: Getting Started
