Any successful e-commerce site needs to be able to fulfil orders. It's difficult to do this if you don't have the contact details and shipping address of the customer. Websites collect this type of information from users by asking them to submit it in a form.
In this section, you will add a form to the Order page. You will also add validation to the form to ensure that the information you collect meets your business rules regarding presence, data type and range of the data submitted. Validation is an important part of form development. It occurs in two locations: in the browser before the form is submitted (client-side validation) and on the server after submission of the form (server-side validation). You should not rely on client-side validation because it is easy to circumvent. Consequently, you should consider client-side validation only as a courtesy to the user. You should consider server-side validation as essential. Therefore you will begin by adding server-side validation in this section. Then you will add client-side validation, not least because the validation framework in Razor Pages makes it trivial to do so.
Model Binding
You will leverage the ASP.NET Core framework's model binding capability as part of robust form development. Model binding is the process that takes values from HTTP requests and maps them to handler method parameters or PageModel properties. Model binding reduces the need for the developer to manually extract values from the request - from the URL or the request body for example - and then assign them, one by one, to variables or properties for later processing. This work can be repetitive, tedious and error prone.
To begin, you will add some public properties to the OrderModel class marked with the BindProperty attribute, which denotes the property as a binding target for values that the user will submit via the order form. The properties map to values that you want to capture in the form.
Add the highlighted lines below to Order.cshtml.cs:
using System.ComponentModel.DataAnnotations;
using Bakery.Data;
using Bakery.Models;
using Microsoft.AspNetCore.Mvc;
using Microsoft.AspNetCore.Mvc.RazorPages;

namespace Bakery.Pages;

public class OrderModel : PageModel
{
    private BakeryContext context;

    public OrderModel(BakeryContext context) => this.context = context;

    [BindProperty(SupportsGet =true)]
    public int Id { get; set; }
    public Product Product { get; set;}
    [BindProperty, Range(1, int.MaxValue, ErrorMessage = "You must order at least one item")]
    public int Quantity { get; set; } = 1;
    [BindProperty, Required, EmailAddress, Display(Name ="Your Email Address")]
    public string OrderEmail {get;set;}
    [BindProperty, Required, Display(Name ="Shipping Address")]
    public string ShippingAddress { get; set; }
    [BindProperty]
    public decimal UnitPrice { get; set; }
    [TempData]
    public string Confirmation { get; set; }
    public async Task OnGetAsync() =>  Product = await context.Products.FindAsync(Id);
}
The additional using directive brings the DataAnnotations namespace into play. This namespace includes a number of attributes, many of which implement ValidationAttribute. You can apply any combination of these attributes to model binding targets (public PageModel properties) to ensure that user input meets your business rules. In this example, you are using the following validation attributes:
EmailAddress- validates whether a string matches the pattern of a "well formed" email addressRequired- specifies that a value is requiredRange- ensures that the value is within the specified range
;;;
Warning
The definition of "well formed" as applied to the EmailAddress attribute leaves something to be desired. It only validates that the submitted string includes just one "@" character within it, and it is neither the first nor the last character. It does not validate for something that meets RFC 6854 for example, or something that can actually receive mail. You should check the source code of any validation attribute to ensure that its logic does indeed meet your business rule requirements.
You have also applied the Display attribute which enables you to customise the value displayed in the UI whenever the property is rendered (such as in a form label). By default, the literal property name is used.
The final attribute of interest - TempData - is not a data annotation attribute. Properties marked with this attribute have their values stored in the TempDataDictionary, which is a simple data structure that enables state to be retained for a short period (usually until the value is accessed). You will use it to store a confirmation message that will be accessed after the form has been submitted.
Adding The Form
Now you can add the form. You will use label tag helpers to generate form labels from the property names (or their Display attribute's Name property), and you will use input tag helpers to generate the form inputs. These enable you to bind the PageModel properties to individual controls. When you do so, the id and name attributes are automatically generated for the rendered HTML element and any value assigned to the property is applied to the form control.
Note
The name attribute is the most important attribute in a form control. Its value is used as the key for name/value pairs passed to the server when the form is submitted, and is matched to public property names or handler method parameter names by the model binder
Add the following lines to Order.cshtml, just before the closing div element:
<form class="col-9" method="post">
  <div class="form-group mb-3">
    <label asp-for="Quantity" class="form-label"></label>
    <input asp-for="Quantity" class="form-control" />
    <span asp-validation-for="Quantity"></span>
  </div>
  <div class="form-group mb-3">
    <label asp-for="OrderEmail" class="form-label"></label>
    <input asp-for="OrderEmail" class="form-control " />
    <span asp-validation-for="OrderEmail"></span>
  </div>
  <div class="form-group mb-3">
    <label asp-for="ShippingAddress" class="form-label"></label>
    <textarea asp-for="ShippingAddress" class="form-control"></textarea>
    <span asp-validation-for="ShippingAddress"></span>
  </div>
  <button type="submit" class="btn bn-sm btn-primary">Place order</button>
</form>
The form makes use of tag helpers to render the labels, inputs and the validation messages. The tag helpers that target input elements are particularly powerful. PageModel properties are assigned to the asp-for attributes on the input tag helpers. The input tag helpers then render the correct name attribute based on the property, so that model binding works seamlessly. Any values assigned to the properties are automatically rendered to the value attribute of the input. The input's type attribute is generated according to the data type of the property.
The form element itself is targeted by a form tag helper, which ensures that a request verification token is rendered as a hidden field within the form.
Read more about how request verification prevents CSRF attacks
Next, you need a handler method for processing the form. Add the following to the Order.cshtml.cs file:
public async Task<IActionResult> OnPostAsync()
{
    Product = await db.Products.FindAsync(Id);
    if(ModelState.IsValid)
    {
        Confirmation = @$"You have ordered {Quantity} x {Product.Name}
                        at a total cost of {Quantity * UnitPrice:c}";
        return RedirectToPage("/OrderSuccess");
    }
    return Page();
}
You begin by fetching details of the product from the database again because HTTP is stateless and data is not persisted across requests. Then this handler method verfifies that ModelState.IsValid, which ensures that the model binding feature is satisfied that all submitted values pass validation checks, and that all required values are present. If there are no validation errors, the user is redirected to a page called OrderSuccess (which you will add shortly). You have assigned a value to the Confirmation property, which is marked with a TempData attribute.
If there are validation errors, entries are added to the ModelState object and IsValid returns false. The current page is redisplayed (return Page()) and the validation tag helpers display the error messages.
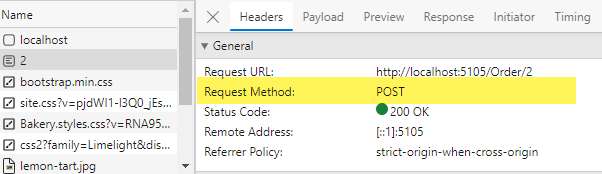
This pattern is known as Post-Redirect-Get (PRG) and is designed to minimise the chance of duplicate submissions resulting from double posting.
Now add the OrderSuccess page to the application using the following command:
dotnet new page --name OrderSuccess --output Pages --namespace Bakery.Pages
Replace the content of the OrderSuccess.cshtml file with the following which renders the confirmation from the TempData dictionary:
@page
@model Bakery.Pages.OrderSuccessModel
@{
}
<div class="progress mb-3" style="height:2.5rem;">
<div class="progress-bar w-100" style="font-size:1.5rem;" role="progressbar">Confirmation</div>
</div>
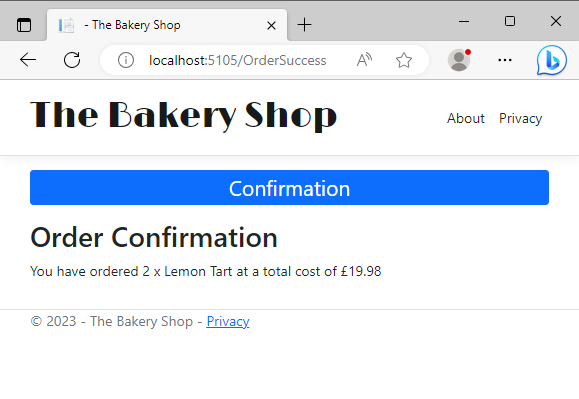
<h1>Order Confirmation</h1>
<p>@TempData[nameof(OrderModel.Confirmation)]</p>
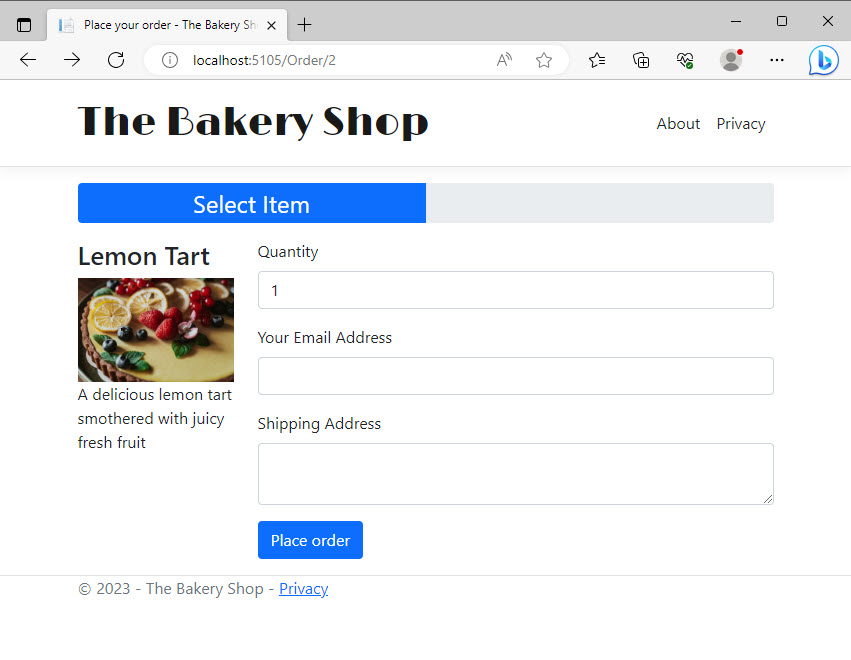
Now it's time to test that the form works and is processed correctly. Launch the application by typing dotnet watch, and then navigate to the home page. Click the Order Now button on any product and ensure that the form has displayed correctly:
Now press the Place Order button without entering an email or shipping address, so that you can test the validation. Both fields should turn pink and error messages should appear below them:
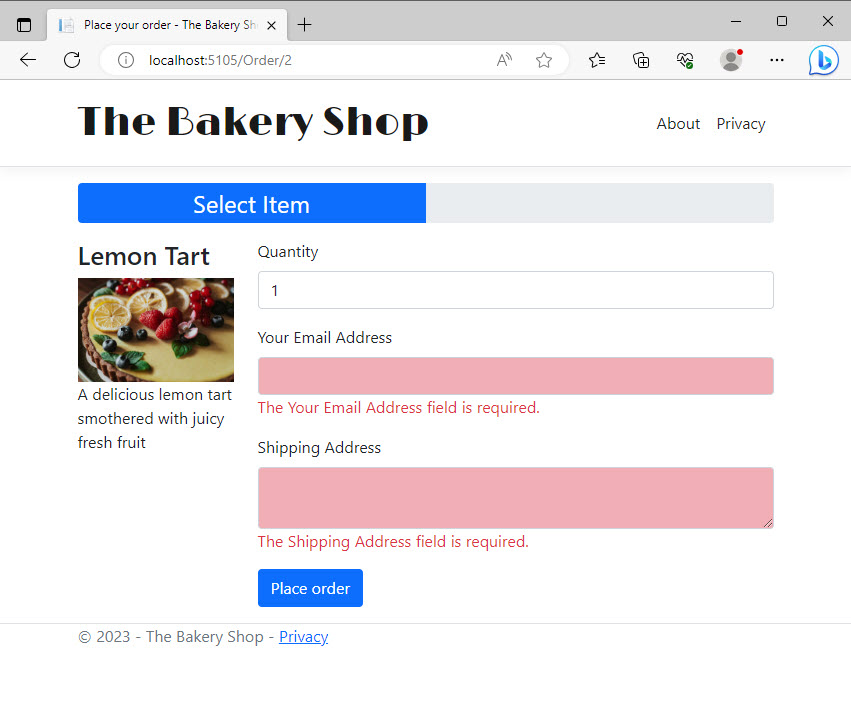
You can perform further tests such as removing the value in the Quantity box, or entering a random string into the email input. Each time, the error messages should appear once you have submitted the form.
Adding Client Side Validation
At the moment, all the validation is performed on the server. When you click the Order Now button, the form is submitted to the server using a POST request, and the entire page is re-rendered to provide feedback to the user.
The round trip is not really noticeable to you while developing the site, because the client and the server are on the same machine. However, in a real world application, there could be some delay before the user receives any feedback. Validating on the client will provide the user with instant feedback.
Warning
Validating on the client should be seen as a courtesy to the user only. It should never replace server-side validation. It is very easy for anyone with a small amount of HTML/JavaScript knowledge to circumvent client-side validation.
Client side validation is included by default in Razor Pages, but it needs to be enabled. You do that by including the jQuery Validation and jQuery Unobtrusive Validation libraries in your page. The code for including these scripts is already available in a partial file named _ValidationScriptsPartial.cshtml which is located in the Pages/Shared folder. To include it, add a partial tag helper to a scripts section in Order.cshtml as illustrated in the highlighted line of code below:
@section scripts{
    <partial name="_ValidationScriptsPartial" />
}
Note
A Section represents a placeholder for a content page to provide additional content to a pre-defined location in a layout page. You can read more about sections here.
Now if you try submitting the form with missing values, the errors appear without the form actually being posted to the server. And if you provide values that satisfy the validation, you should get taken to the OrderSuccess page:
Summary
In this section, you have created a form using tag helpers and added both server-side and client-side validation and tested that both work. In the next section, you will continue with client-side development then you learn how to configure TypeScript in the application to manage your JavaScript files, when you add some logic to calcuate the total cost of the order interactively.
Next: Configuring TypeScript
Previous: Working With Data
