HTTP, and therefore the World Wide Web is stateless. This means that the Hypertext Transfer Protocol (HTTP), which is the underlying protocol used for communication on the World Wide Web, does not retain any information about previous interactions or requests between a client (such as a web browser) and a server.
When a client sends an HTTP request to a server, the server processes the request and sends back a response. However, the server does not store any information about the client's previous requests or maintain any knowledge of the client's state. Each request is treated as an independent and isolated transaction.
To maintain any form of state between requests, web applications must implement their own state management techniques. You have already used one such technique when you worked with TempData in the forms section. However, TempData is designed to be short-lived. By default, it is disposed of once accessed. If you want to enable your users to order multiple different goods in one financial transaction, you need a more robust solution for "remembering" each item.
Cookies (which are the mechanism behind TempData) provide a solution. They are small text files that can be stored on the user's device. By default, they expire at the end of a browser session, but expiry can be extended to any time in the future.
In this section, you will use a cookie to store the user's "shopping basket", which consists of a collection of order items. So to start, add a new class to the Models folder that will be used to represent an order item by executing the following command:
dotnet new class -n OrderItem -o Models
Open the new file and replace its content with the following:
namespace Bakery.Models;
public class OrderItem
{
    public int ProductId { get; set; }
    public decimal UnitPrice { get; set; }
    public int Quantity { get; set; }
}
Each order item represents the key value of a product, the unit price and the quantity ordered. Next, add a class to represent the basket - a collection of order items and a property that calculates the total number of items in the basket:
dotnet new class -n Basket -o Models
Change the content of the Basket.cs file to :
namespace Bakery.Models;

public class Basket
{
    public List<OrderItem> Items { get; set; } = new ();
    public int NumberOfItems => Items.Sum(x => x.Quantity);
}
In the next step, you will amend the Order page to populate a basket instance and store the basket in the cookie. Begin by commenting out or removing the OrderEmail and ShippingAddress properties in the OrderModel class, together with their associated form fields, labels and validation tag helpers in the order form itself. The resulting form should only include a control for the quantity, and a hidden field for the unit price.
The workflow you will implement in the revised OnPostAsync method will check to see if a cookie containing the basket exists. If it does, its contents will be hydrated as a Basket instance, and the item being ordered will be added to it. Otherwise a new Basket instance will be created with details of the order. Either way, the resulting basket will be serialised to JSON and assigned to the cookie.
Start by adding a using directive to the Order.cshtml.cs file to reference the System.Text.Json namespace, which contains APIs for working wiht JSON:
using System.Text.Json;
Then change the OnPostAsync method to the following:
public async Task<IActionResult> OnPostAsync()
{
    if(ModelState.IsValid)
    {
        Basket basket = new ();
        if(Request.Cookies[nameof(Basket)] is not null)
        {
            basket = JsonSerializer.Deserialize<Basket>(Request.Cookies[nameof(Basket)]);
        }
        basket.Items.Add(new OrderItem {
            ProductId = Id,
            UnitPrice = UnitPrice,
            Quantity = Quantity
        });
        var json = JsonSerializer.Serialize(basket);
        Response.Cookies.Append(nameof(Basket), json);

        return RedirectToPage("/Index");
    }
    Product = await context.Products.FindAsync(Id);
    return Page();
}
Cookies consist of a key/value pair, the key being the name of the cookie and the value being the information associated with the key. Once set, they are included in every request and can be accessed via the Request.Cookies collection. Your cookie is named Basket, so you test to see if it exists. If it doesn't, it is null, so this test is important in preventing a NullReferenceException, which is a common issue when working with cookies. If it exists, you deserialise its content and assign it to the Basket that is instantiated at the beginning of the method. Then you add details of the item bwing ordered. Finally, you serialise the modified basket and assign the resulting JSON to the cookie and append it to the response, overwriting any previous version of the cookie. Then you send the user back to the home page so that they can continue ordering.
To test the cookie, open the browser developer tools (F12 in Chrome or Edge). Focus on the Application tab and expand the Cookies node under Storage. Then click on the URL for your app (http://localhost:5105 in the image below). Navigate to the home page. Click on the Order Now button for any product and place an order for any quantity. Notice that two cookies appear - the Antiforgery token cookie, and the Basket cookie. Order another product and then examine the contents of the Basket cookie. You should see details of the ordered items:
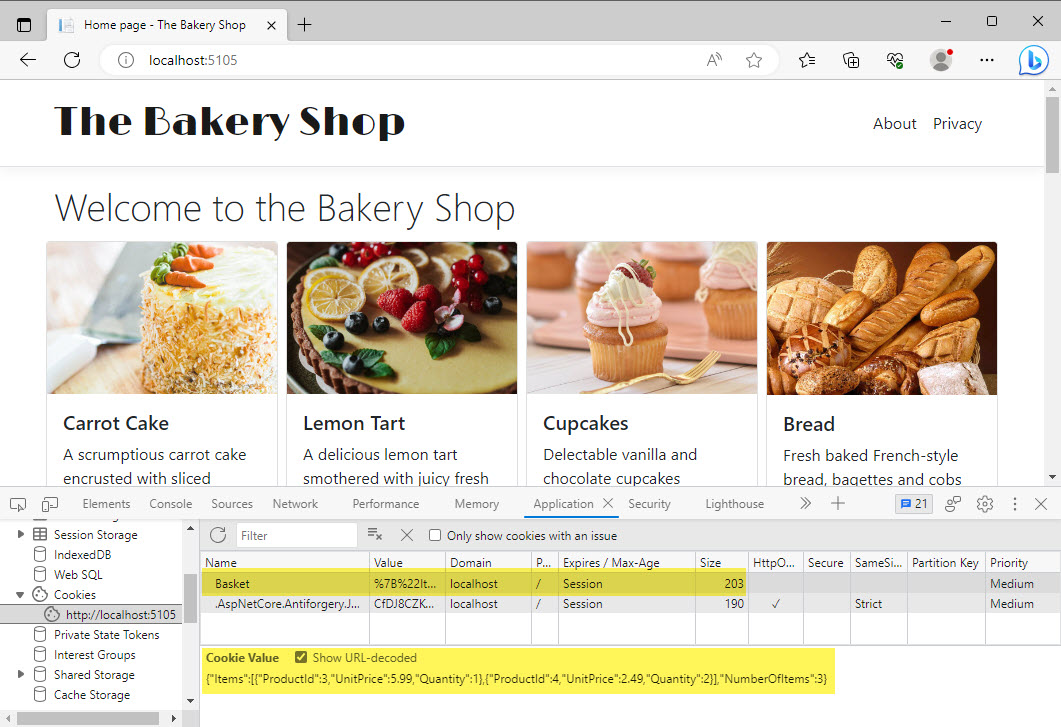
Notice the value in the Expires / Max-Age column in the image. It is currently set to Session, which refers to a browser session. As soon as the browser instance is terminated, the cookie will disappear. On most shopping sites, cookie-based baskets are persisted beyond the browser session. You may have noticed that sites "remember" what you added to a basket months after you last visited them.
Before moving on to the next section, you will modify your code to set an expiry time for the basket cookie via a CookieOptions object. The changes are highlighted below:
if(ModelState.IsValid)
{
    Basket basket = new ();
    if(Request.Cookies[nameof(Basket)] is not null)
    {
        basket = JsonSerializer.Deserialize<Basket>(Request.Cookies[nameof(Basket)]);
    }
    basket.Items.Add(new OrderItem{
        ProductId = Id,
        UnitPrice = UnitPrice,
        Quantity = Quantity
    });
    var json = JsonSerializer.Serialize(basket);
    var cookieOptions = new CookieOptions
    {
        Expires = DateTime.Now.AddDays(30)
    };
    Response.Cookies.Append(nameof(Basket), json, cookieOptions);

    return RedirectToPage("/Index");
}
Now if you add another item to your order, you should see the value in the Expires / Max-Age is updated to reflect an expiry time 30 days from the present:
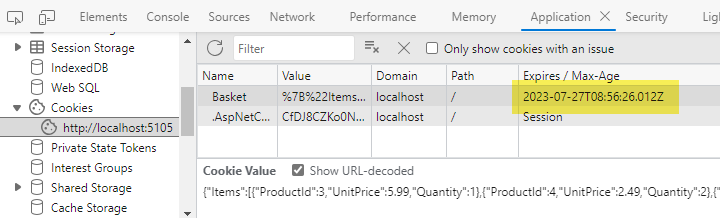
Close the browser and re-open it and the cookie persists.
Summary
In this section, you have implemented one of the most commonly-used state management techniques in web development - the cookie. You used it to store a JSON representation of your user's shopping basket, and you learned how to persist the cookie for an arbitrary period. In the next section, you will add a widget to the site representing the basket. You will implement this as a View Component - a feature that is similar to a partial view except that it encapsulates its own rendering logic.
Next: View Components
Previous: Adding TypeScript Support
