Select lists or DropDown lists are used in a Razor Pages form to enable users to select zero or more predefined options. They are rendered in HTML as a select element, which acts as a container for a number of option elements, each representing an available choice.
Select List Basics
The following example is used to illustrate the main features of these two HTML elements:
<select name="number">
    <option value="">Select a number</option>
    <option value="1">One</option>
    <option value="2">Two</option>
    <option value="3">Three</option>
</select>
This renders as
The select element has a name attribute. This is used as the key for any selected value(s) when a form is submitted. You can access the value by passing the key as an indexer to the Request.Form collection:
var number = Request.Form["number"];
The recommended approach, however is to add a suitable property to the PageModel and to allow model binding to apply the posted value to the property:
public IndexModel : PageModel
{
    [BindProperty]
    public int Number { get; set; }

    public void OnPost()
    {
        // posted value is assigned to the Number property automatically
    }
}
Razor Select Lists
Razor offers two ways to generate select lists: the select tag helper and the DropDownList (and DropDownListFor) Html Helpers, which are artefacts inherited from pre-ASP.NET Core versions of the MVC framework. This guide will only focus on the tag helper. If you are interested in learning how to use the HTML helpers, check the "Further Reading" section at the end.
The select tag helper has two attributes: for and items. The for attribute takes the name of the PageModel property that represents the selected value, or values. If the PageModel property passed to the for attribute is some kind of collection, the tag helper assumes that you want to allow the user to make multiple selections and will add the multiple attribute to the rendered select element.
The items attribute expects a collection of SelectListItem objects, a SelectList object or an enumeration that provide the options for the select list. It will generate option elements for each item.
Creating Options
There are many ways to shape data for consumption as options in a select tag helper. The following examples will cover the most common of those.
Map Data To Collection Of SelectListItem
The SelectListItem class has Text, ValueandSelectedproperties. The first two of these are strings, and theSelected` property is a boolean. You can project data from an Entity Framework context to a collection of SelectListItem like this:
public List<SelectListItem> Options { get; set; }

public void OnGet()
{
    Options = context.Authors.Select(a =>
                                  new SelectListItem
                                  {
                                      Value = a.AuthorId.ToString(),
                                      Text =  a.Name
                                  }).ToList();
}
This property is then available to be assigned to the items attribute in the select tag helper:
<select name="authorId" asp-items="Model.Options"></select>
Creating A SelectList
You can create a SelectList from any collection but you need to specify the DataTextField and DataValueField values for the select tag helper to bind the options correctly:
public SelectList Options { get; set; }

public void OnGet()
{
    Options = new SelectList(context.Authors, nameof(Author.AuthorId), nameof(Author.Name));
}
Here's a version that takes a Dictionary:
public SelectList Options { get; set; }

public void OnGet()
{
    var dictionary = context.Authors.ToDictionary<int, string>(k => k.AuthorId, v => v.Name);
    Options = new SelectList(dictionary, "Key", "Value");
}
Using An Enumeration
The Html.GetEnumSelectList method makes it easy to use an enumeration as the data source for a select list. This next example shows how to use the System.DayOfWeek enumeration to present the days of the week as option values, and assumes that the PageModel has a property of the correct type called DayOfWeek:
public DayOfWeek DayOfWeek { get; set; }
<select asp-for="DayOfWeek" asp-items="Html.GetEnumSelectList<DayOfWeek>()">
    <option value="">Choose a day</option>
</select>
The resulting HTML looks like this:
<select data-val="true" data-val-required="The DayOfWeek field is required." id="DayOfWeek" name="DayOfWeek">
    <option value="">Pick one</option>
    <option selected="selected" value="0">Sunday</option>
    <option value="1">Monday</option>
    <option value="2">Tuesday</option>
    <option value="3">Wednesday</option>
    <option value="4">Thursday</option>
    <option value="5">Friday</option>
    <option value="6">Saturday</option>
</select>
In this example, the first option is selected. This is because it matches the default value of DayOfWeek. If you do not want the default value to be pre-selected, you can make your model property nullable:
public DayOfWeek? DayOfWeek { get; set; }
If you own the enumeration, it may be that the member names (being restricted to what is permitted by C#) are not particularly user friendly. The select tag helper is responsive to data annotation hints when generating options. You can use the DisplayAttribute to configure better names for enumeration members:
public enum Rating
{
    Unrated,
    [Display(Name="1 Star")]
    OneStar,
    [Display(Name="2 Star")]
    TwoStar,
    [Display(Name="3 Star")]
    ThreeStar,
    [Display(Name="4 Star")]
    FourStar,
    [Display(Name="5 Star")]
    FiveStar
}
Note: This makes use of the DisplayAttribute, not the DescriptionAttribute, which is the attribute you normally use to apply an alternative name for enumeration options. The select tag helper will not respond to values applied via a DescriptionAttribute.
Model Binding
Selected values will automatically be bound to the property passed in to the asp-for attribute, so long as the property is a suitable type for capturing the selected value(s) - an int, string or enum. Or, if you permit multiple selections, a collection of any of these. The property must be declared as public and be decorated with the BindProperty attribute.
The name of the property is used to generate the values for the name and id attributes in the rendered HTML, although it is important to remember that only the name attribute is used in model binding.
Enabling Multiple Selections
To enable multiple selections, you can either add the multiple attribute to the select element, or you can pass a collection type to the asp-for attribute, which will result in the multiple attribute being rendered. Suitable types for capturing multiple values are collections of int, string, or enumerations, if that is what was used to construct the options.
In the following example, two properties are added to the PageModel. the first is a simple array of integers, whcih will be used to capture the selected values. The second property, TagOptions, is instantiated within the OnGet` handler:
[BindProperty]
public int[] SelectedTags { get; set; }
public SelectList TagOptions { get; set; }

public void OnGet()
{
    TagOptions = new SelectList(_tagService.GetTags(), nameof(Tag.TagId), nameof(Tag.TagName));
}
The SelectedTags array is assigned to the asp-for attribute in the select tag helper:
<select asp-for="SelectedTags" asp-items="Model.TagOptions"></select>
This results in a "list box" being rendered rather than a drop down selector:
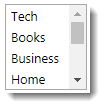
The generated HTML includes the multiple attribute, which is what triggers this change in a appearance:
<select id="SelectedTags" multiple="multiple" name="SelectedTags">
<option value="1">Tech</option>
<option value="2">Books</option>
<option value="3">Business</option>
<option value="4">Home</option>
<option value="5">Living</option>
<option value="6">Social</option>
<option value="7">Work</option>
<option value="8">Pets</option>
<option value="9">Family</option>
</select>
The multiple attribute has the value "multiple" assigned to it, but any value (or none at all) will achieve the same effect. All of the following are valid ways to enable multiple selection in non-XHTML doctypes:
multiple
multiple=""
multiple="true"
multiple="false"
multiple="London"
The mere presence of the multiple attribute is the important thing.
You can also render a list box by using the size attribute. However, users might find that confusing if multiple selection is not enabled too.
Setting Selected Items
The simplest way to set a particular value (or values) as selected is to assign that value to the property passed in to the asp-for attribute. In the next example, the tags that featured in the previous demonstration will be used again, but this time the property passed in to the asp-for attribute will be singular, and will have a value assigned:
[BindProperty]
public int SelectedTag { get; set; };
public SelectList TagOptions { get; set; }

public void OnGet()
{
    TagOptions = new SelectList(_tagService.GetTags(), nameof(Tag.TagId), nameof(Tag.TagName));
    SelectedTag = 5;
}
Here's the tag helper again:
<select asp-for="SelectedTags" asp-items="Model.TagOptions"></select>
Now the generated HTML shows that the item with a value of "5" has been selected:
<select data-val="true" data-val-required="The SelectedTag field is required." id="SelectedTag" name="SelectedTag">
<option value="1">Tech</option>
<option value="2">Books</option>
<option value="3">Business</option>
<option value="4">Home</option>
<option selected="selected" value="5">Living</option>
<option value="6">Social</option>
<option value="7">Work</option>
<option value="8">Pets</option>
<option value="9">Family</option>
</select>
The SelectedTag property is not nullable. When the page is executed, it will acquire the default value for its type, in this case 0. Therefore if you have an item in the list of options with this value, it will be selected by default. That might not be what you intended. If there is a possibility of an item existing in the options with that value, you may want to consider making the property nullable instead. You will certainly want to make it nullable if the value is not required.
Option Labels
If you are showing a form to the user for the first time, you often want to display a default empty item, also known as an option label. The simplest way to do this with the select tag helper is to include an empty option element:
<select asp-for="SelectedTags" asp-items="Model.TagOptions">
    <option value="">Choose a tag</option>
</select>
The options represented by Model.TagOptions will be appended to any options already provided in this way.
Option Groups
The SelectListGroup class represents an HTML optgroup element. If you want to use optgroups, you can create SelectListGroup instances as required, and then apply them to individual SelectListItems:
public int Employee { get; set; }
public List<SelectListItem> Staff { get; set; }

public void OnGet()
{
    var Sales = new SelectListGroup { Name = "Sales" };
    var Admin = new SelectListGroup { Name = "Admin" };
    var IT = new SelectListGroup { Name = "IT" };

    Staff = new List<SelectListItem>
    {
        new SelectListItem{ Value = "1", Text = "Mike", Group = IT},
        new SelectListItem{ Value = "2", Text = "Pete", Group = Sales},
        new SelectListItem{ Value = "3", Text = "Katy", Group = Admin},
        new SelectListItem{ Value = "4", Text = "Dean", Group = Sales}
    };
}
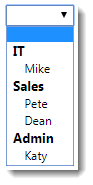
The following shows the rendered HTML (indented for clarity):
<select data-val="true" data-val-required="The Employee field is required." id="Employee" name="Employee">
    <option value=""></option>
    <optgroup label="IT">
        <option value="1">Mike</option>
    </optgroup>
    <optgroup label="Sales">
        <option value="2">Pete</option>
        <option value="4">Dean</option>
    </optgroup>
    <optgroup label="Admin">
        <option value="3">Katy</option>
    </optgroup>
</select>
If you are using a SelectList, you can specify the property to be used for grouping in the constructor:
public SelectList Staff { get; set; }
[BindProperty]
public int SelectedStaffId { get; set; }
public void OnGet()
{
    var staff = new List<Person>{
        new Person{ Id = 1, Name = "Mike", Department = "IT"},
        new Person{ Id = 2, Name = "Pete", Department = "Sales"},
        new Person{ Id = 3, Name = "Katy", Department = "Admin"},
        new Person{ Id = 4, Name = "Dean", Department = "Sales"}
    };

    Staff = new SelectList(staff, nameof(Person.Id), nameof(Person.Name), null, nameof(Person.Department));
}
<select asp-for="SelectedStaffId" asp-items="Model.Staff">
    <option value=""></option>
</select>
Further Reading
Examples showing the use of the Html.DropDownList helpers:
