Checkboxes are used in a Razor Pages form to enable users to select zero or more predefined options. Checkboxes are a type of input element, and some aspects of their behaviour is unique and needs to be understood when deciding whether, and how to use them.
Checkbox Basics
Checkboxes are rendered in HTML by setting the type attribute in an input element to checkbox:
<input type="checkbox">
This appears in most browsers as a small box: . When it is selected, the box acquires a tick: . This state is indicated in HTML by the presence of a checked attribute on the element:
<input type="checkbox" checked>
You can also provide a value to the checked attribute. Any of the following are considered valid values according to the HTML 5 spec:
<input type="checkbox" checked="">
<input type="checkbox" checked="checked">
<input type="checkbox" checked="CHECKED">
Most browsers will interpret any value as indicating true, so even the following will result in the checkbox being checked:
<input type="checkbox" checked="false">
Note that if you pass a Razor expression to the checked attribute that evaluates to anything other than true, the checked attribute will not be rendered at all. So the following will result in the checked attribute being omitted from the generated HTML:
<input type="checkbox" checked="@(1 == 0)">
As with any form field, the checkbox needs a name attribute specified so that its a value can be submitted.
<input type="checkbox" name="myCheckbox">
The value will only be submitted if the checkbox is checked. If nothing is specified for the value attribute, on will be submitted for a checkbox value:

Razor Checkboxes
Razor offers two ways to generate checkboxes. The recommended approach is to use the input tag helper. Any boolean property of the PageModel will render a checkbox if it is passed to the asp-for attribute, so long as the property is not nullable:
public class IndexModel : PageModel
{
    public bool IsChecked { get; set; }
    ...
}
<input asp-for="IsChecked">
You can also use a string property, so long as the value of the string can be parsed as a boolean value (true or false).
The property name passed to the asp-for attribute is used for the values of both the id and name attributes. The rendered HTML will also include two fields for the IsChecked property:
<input type="checkbox" data-val="true" data-val-required="The IsChecked field is required." id="IsChecked" name="IsChecked" value="true">
<input name="IsChecked" type="hidden" value="false">
The second field is a hidden field. It will be submitted regardless whether the checkbox is checked or not. If the checkbox is checked, the posted value will be true,false. The model binder will correctly extract true from the value. Otherwise it will be false. This behaviour is really a feature of MVC, where selection of which particular action to execute on a controller can come down to the parameters that the action method takes. The hidden field will ensure that the checkbox will correspond to a bool parameter of an action method, or a Razor Pages handler method.
If you don't want a hidden field to be rendered, the workaround is to NOT use the tag helper to render your checkbox.
The second mechanism for generating checkboxes is the CheckBox (and CheckBoxFor) Html helper method, which again are features of MVC. Nevertheless, it is worth understanding how these work since they are available from within a PageModel.
The Html.CheckBox helper takes a string that is used to render the name and id attributes of the input element:
@Html.CheckBox("IsChecked")
There are overloads that enable you to set the checkbox as checked, and to provide additional arbitrary attributes:
@Html.CheckBox("IsChecked", new { @class = "form-control" })
The Html.CheckBoxFor helper is similar to the tag helper in that it takes an expression to be evaluated against the current model:
@Html.CheckBoxFor(model => model.IsChecked)
Consequently, it supports working in a strongly typed manner where only properties of the current model will be made available by IntelliSense.
Both of the Html helper methods result in a hidden field being generated along with the checkbox.
Binding to Collections
All of the examples above illustrate rendering a single checkbox to capture a single choice. Checkboxes can also be used to manage multiple selections. Checkboxes can be used with simple collections, such as those that permit the user to select one or more options from a prepared list, or they can be used in conjunction with a collection of complex objects.
Simple Collections
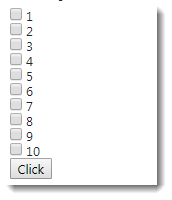
The following Razor code illustrates generating 10 checkboxes, all with the same value for the name attribute, but each with a different value attribute:
<form method="post">
    @for (var i = 1; i <= 10; i++)
    {
        <input name="AreChecked" type="checkbox" value="@i" /> @i<br />
    }
    <button>Click</button>
</form>
This is how the resulting HTML renders:
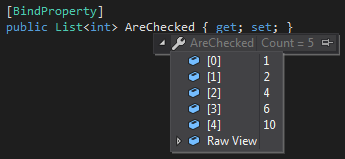
When you select multiple boxes and submit the form, the values are included in the request like this:
AreChecked=1&AreChecked=2&AreChecked=4&AreChecked=6&AreChecked=10
ASP.NET Core processes that into StringValues type, which represents null/zero, one or more strings:

The model binder will bind those values to a collection whose property name matches the value of the name attribute of the elements and whose type supports conversion of the submitted values. In this case, a collection of type int will work, as well as a collection of string types:
The key to this scenario is to ensure that the name attribute is the same for each input. Also, you should note that if you specify a non-boolean property in the asp-for attribute of an input tag helper, Razor renders an input whose type is set to text, so you must use plain HTML to render checkboxes that enable binding to a simple collection.
Collections of Complex Objects
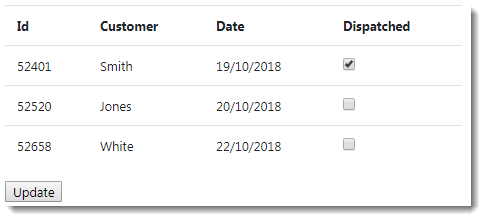
In the next example, the checkbox is used to represent a boolean property of a complex type - the Dispatched property of an Order entity. You have a list of orders made this week. You have added a property to the PageModel to represent the data and ensured that posted values will be bound to it:
[BindProperty]
public List<Order> OrdersThisWeek { get; set; } = new List<Order>();
You want to display the orders on screen together with an updatable checkbox to indicate whether the order has been dispatched. Therefore the task is to get the model binder to associate each checkbox with a specific order. The following code shows how that is achieved:
<form method="post">
    <table class="table">
        <tr>
            <th>Id</th>
            <th>Customer</th>
            <th>Date</th>
            <th>Dispatched</th>
        </tr>
        @for (var i = 0; i < Model.OrdersThisWeek.Count(); i++)
        {
            <tr>
                <td>
                    <input type="hidden" asp-for="OrdersThisWeek[i].OrderId" />
                    @Model.OrdersThisWeek[i].OrderId
                </td>
                <td>@Model.OrdersThisWeek[i].Customer</td>
                <td>@Model.OrdersThisWeek[i].OrderDate.ToShortDateString()</td>
                <td><input asp-for="OrdersThisWeek[i].Dispatched" /></td>
            </tr>
        }
    </table>
    <button>Update</button>
</form>
Here is how the HTML renders:
The key to associating related properties of items in a collection is to use an indexer. In the example above, a sequential index has been used. Sequential indices must start at zero, and there can be no gaps in the sequence.
Although the example above features an edit scenario, sequential indices are more likely to be used when adding collections of new items. When editing collections, you are more likely to use the other type of index supported by the model binder - an explicit index.
An explicit index supports any value that uniquely identifies an item of data. Usually, this is the key value for an item, typically an int, but you can just as validly use GUIDs, strings, date and time values etc. When using this indexing system, you must include a hidden field that explicitly states the index value for an item. The hidden field must be named in the form boundpropertyname.Index, and the value must be the index. Here is the previous form modified to use the order's OrderId value as an explicit index:
<form method="post">
    <table class="table">
        <tr>
            <th>Id</th>
            <th>Customer</th>
            <th>Date</th>
            <th>Dispatched</th>
        </tr>
        @foreach (var order in Model.OrdersThisWeek)
        {
            <tr>
                <td>
                    <input type="hidden" name="OrdersThisWeek.Index" value="@order.OrderId" />
                    <input type="hidden" name="OrdersThisWeek[@order.OrderId].OrderId" value="@order.OrderId" />
                    @order.OrderId
                </td>
                <td>@order.Customer</td>
                <td>@order.OrderDate.ToShortDateString()</td>
                <td><input name="OrdersThisWeek[@order.OrderId].Dispatched" value="true" /></td>
            </tr>
        }
    </table>
    <button>Update</button>
</form>
This time, it is not possible to use tag helpers to generate the checkbox. Therefore you must set the name and value attributes yourself.
